

Blog

Make Your Hot Water Heater Last Longer By Flushing The Tank
Even though water heaters don't need much ongoing maintenance, this doesn't mean that they should be ignored outright. In fact, homeowners should regularly maintain their water heaters if they are interested in maximizing equipment lifespans and want to keep hot water consistently available to use. In addition, maintenance reduces energy costs, which further makes regular upkeep a smart move.With this in mind, one simple maintenance task for your hot water heater is to perform an annual flush. Flushing your hot water heater isn't difficult, and you will benefit by the resulting long-term cost savings.
Supplies Needed
The materials and tools needed to flush your hot water heater are fairly minimal, and chances are you have most, if not all, already available on hand:
- Garden hose with ¾-inch fittings
- Gloves
- Eye protection
- Flashlight
If you are unable to route the garden hose to an appropriate location, You will also need a five-gallon bucket.
Performing the Water Heater FlushThe first thing to keep in mind is that safety is of the utmost importance. Hot water heaters produce large amounts of scalding water, and carelessness could cause serious burn injuries. Never attempt to flush the tank without wearing both hand and eye protection.
After you have gathered all the necessary tools and materials, you are ready to begin:
1. Turn off the hot water heater.
Once you are equipped with your safety gear, locate the thermostat controls for the hot water heater and turn them to the 'off' position. You may need to use a flashlight to read the instructions on the side of the tank or to locate the thermostat if the tank is in a dark location.
2. Disconnect the electricity or gas.
After the hot water heater has been shut down, the next step is to disconnect the electrical or gas supply to the tank. Most electric hot water heaters are hardwired, so disconnection will likely entail flipping off the relevant circuit breaker switch at the panel.
For gas hot water heaters, the incoming gas line should be equipped with a ball valve. Turn the handle on the valve 90-degrees to shut off the flow of gas.
3. Allow the water to cool.
Once you have shut down electrical power or gas service to the water heater, the unit should be given time to cool down before proceeding. You can speed up the process by turning all the faucets in your home to 'hot' - the incoming cold water will quickly cool down the remaining water in the tank.
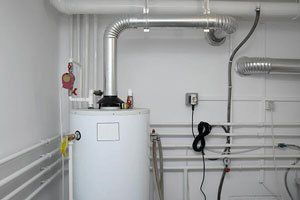
4. Attach the garden hose to the drain valve.
A drain valve is located at the bottom of the hot water heater. Depending on the model owned, this valve may be fashioned from brass or plastic and will resemble an outdoor spigot.
Once you have located the drain valve, attach the garden hose to the fitting. Tighten the connection by hand only, as tools may strip the threads on the valve.
Next, route the opposite end of the hose to a safe location for discharging water. In addition, be sure the location is visible so that you can view the outgoing flow of water. If you are unable to find a suitable spot for discharge, place the end of the hose into a five-gallon bucket.
5. Flush the tank.
After the water tank has been connected to the garden hose, slowly open the drain valve - water should start flowing from the tank into the hose. Monitor the discharge from the end of the hose, as you will likely view numerous small particles of calcium and magnesium that had settled as sediment inside the tank.
Continue watching the discharge from the hose and close the drain valve when very few particles are now exiting the hose.
6. Disconnect the garden hose and restore service.
Once the flushing process has ended, remove the garden hose from the drain valve. Next, reconnect electricity or gas to the water heater and restart the unit as directed.
If you have questions about your hot water heater or need a new tank, be sure to contact Complete PLUMBINGfor help. We can provide solutions to all of your water heater and other plumbing needs.


Installation
Services
and Military Discount